> For the complete documentation index, see [llms.txt](https://edrus.gitbook.io/mt-it/llms.txt). Markdown versions of documentation pages are available by appending `.md` to page URLs; this page is available as [Markdown](https://edrus.gitbook.io/mt-it/2nd-month/week-6/dom-document-object-model/working-with-events/mouse-events.md).
# Mouse Events
### Introduction to JavaScript mouse events
Mouse events fire when you use the mouse to interact with the elements on the page. DOM Level 3 events define nine mouse events.
#### `mousedown`, `mouseup`, and `click`
When you `click` an element, there are no less than three mouse events fire in the following sequence:
1. The `mousedown` fires when you depress the mouse button on the element.
2. The `mouseup` fires when you release the mouse button on the element.
3. The `click` fires when one `mousedown` and one `mouseup` detected on the element.
If you depress the mouse button on an element and move your mouse off the element, and then release the mouse button. The only `mousedown` event fires on the element.
Likewise, if you depress the mouse button, move the mouse over the element, and release the mouse button, the only `mouseup` event fires on the element.
In both cases, the `click` event never fires.
#### `dblclick`
In practice, you rarely use the `dblclick` event. The `dblclick` event fires when you double click over an element.
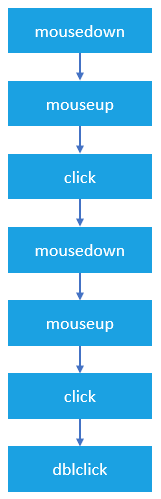
It takes two click events to cause a `dblclick` event to fire. The `dblclick` event has four events fired in the following order:
1. `mousedown`
2. `mouseup`
3. `click`
4. `mousedown`
5. `mouseup`
6. `click`
7. `dblclick`
As you can see, the `click` events always take place before the `dblclick` event. If you register both `click` and `dblclick` event handlers on the same element, you will not know exactly what user actually has clicked or double-clicked the element.
#### `mousemove`
The `mousemove` event fires repeatedly when you move the mouse cursor around an element. Even when you move the mouse one pixel, the `mousemove` event still fires. It will cause the page slow, therefore, you only register `mousemove` event handler only when you need it and immediately remove the event handler as soon as it is no longer used, like this:
```javascript
element.onmousemove = mouseMoveEventHandler;
// ...
// later, no longer use
element.onmousemove = null;Code language: JavaScript (javascript)
```
#### `mouseover` / `mouseout`
The `mouseover` fires when the mouse cursor is outside of the element and then move to inside the boundaries of the element.
The `mouseout` fires when the mouse cursor is over an element and then moves another element.
#### `mouseenter` / `mouseleave`
The `mouseenter` fires when the mouse cursor is outside of an element and then moves to inside the boundaries of the element.
The `mouseleave` fires when the mouse cursor is over an element and then moves to the outside of the element’s boundaries.
Both `mouseenter` and `mouseleave` does not bubble and does not fire when the mouse cursor moves over descendant elements.
### Registering mouse event handlers
To register a mouse event, you use these steps:
* First, select the element by using [`querySelector()`](https://www.javascripttutorial.net/javascript-dom/javascript-queryselector/) or [`getElementById()`](https://www.javascripttutorial.net/javascript-dom/javascript-getelementbyid/) method.
* Then, register the mouse event using the `addEventListener()` method.
For example, suppose that you have the following button:
```xml
Code language: HTML, XML (xml)
```
To register a mouse click event handler, you use the following code:
```javascript
let btn = document.querySelector('#btn');
btn.addEventListener('click',(event) => {
console.log('clicked');
});Code language: JavaScript (javascript)
```
or you can assign a mouse event handler to the element’s property:
```javascript
let btn = document.querySelector('#btn');
btn.onclick = (event) => {
console.log('clicked');
};Code language: JavaScript (javascript)
```
In legacy systems, you may find that the event handler is assigned in the HTML attribute of the element:
```xml
Code language: HTML, XML (xml)
```
It’s a good practice to always use the `addEventListener()` to register a mouse event handler.
### Detecting mouse buttons
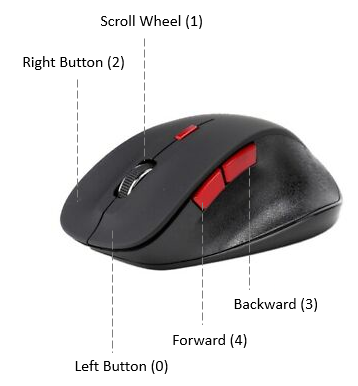
The `event` object passed to the mouse event handler has a property called `button` that indicates which mouse button was pressed on the mouse to trigger the event.
The mouse button is represented by a number:
* 0: the main mouse button is pressed, usually the left button.
* 1: the auxiliary button is pressed, usually the middle button or the wheel button.
* 2: the secondary button is pressed, usually the right button.
* 3: the fourth button is pressed, usually the Browser Back button.
* 4: the fifth button is pressed, usually the *Browser Forward* button.
See the following example:
```xml
JS Mouse Events - Button Demo
Code language: HTML, XML (xml)
```
In this example, when you click the button with your mouse (left-click, right-click, and middle-click), it shows a corresponding message on the `
` element.
### Modifier keys
When you click an element, you may press one or more modifier keys: Shift, Ctrl, Alt, and Meta.
Note the Meta key is the Windows key on Windows keyboards and the Command key on the Apple keyboard.
To detect if these modifier keys have been pressed, you can use the `event` object passed to the mouse event handler.
The `event` object has four Boolean properties, where each is set to `true` if the key is being held down or `false` if the key is not pressed.
See the following example:
```xml
JS Modifier Keys Demo
Code language: HTML, XML (xml)
```
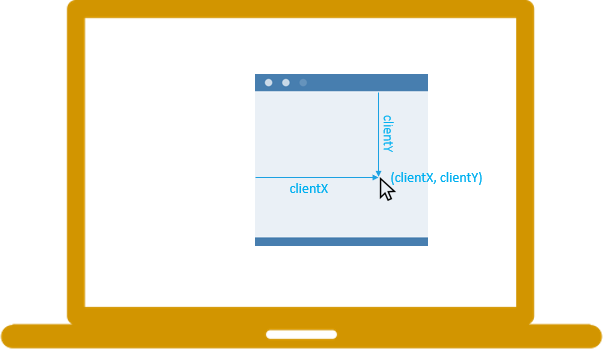
### Getting Screen Coordinates
The `screenX` and `screenY` properties of the event passed to the mouse event handler return the screen coordinates of the location of the mouse in relation to the entire screen.
On the other hand, the `clientX` and `clientY` properties provide the horizontal and vertical coordinates within the application’s client area at which the mouse event occurred:
See the following demo:
```xml
JS Mouse Location Demo
Move your mouse to see its location.
Code language: HTML, XML (xml)
```
### Summary
* DOM Level 3 defines nine mouse events.
* Use `addEventListener()` method to register a mouse event handler.
* The `event.button` indicates which mouse button was pressed to trigger the mouse event.
* The modifier keys: alt, shift, ctrl, and meta (Mac) can be obtained via properties of the event object passed to the mouse event handler.
* The `screenX` and `screenY` properties return the horizontal and vertical coordinates of the mouse pointer in screen coordinates.
* The `clientX` and `clientY` properties of the `event` object return horizontal and vertical coordinates within the application’s client area at which the mouse event occurred.